Pages

Sunday, December 18, 2011

Apartment Tour: Bedroom

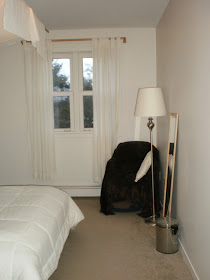
I'm kind of proud of our little apartment. This was the homiest place we've lived so far. This is the bedroom. I tried to keep the minimum in here in terms of furniture. The bassinet is fairly recent and also temporary as my little monster has grown out of it all ready.

I made the valence above the bed. It was pretty simple. I hung some bamboo ($0.80 each) with fishing line then draped fabric over them. I had to tie the fabric on with a bit of thread. I bought the fabric from the sale bin for $4.00.

The chair is second hand. There is a blanket draped over it so that it will match and has a reading lamp near by.

The comforter was $30. I got the throw pillows and bundled sticks on sale as well. Overall, this room was pretty cheap to put together.

Fajitas

Before swearing off meat I used to enjoy fajitas rather regularly. Since then I tried making them with just the fried pepper and onion but I found them a little plain. Marinated mushrooms were the solution to that problem. I found the marinade recipe in the cookbook Vegan Fire & Spice that I got from the library. I since returned the book so I might be missing a few minor ingredients but I committed the main ones to memory and I didn't follow the recipe exactly anyway. We really liked how this turned out and are planning to have it again.

Marinade Ingredients
1/2 cup lime juice
1 jalapeno, seeded and sliced
1 tsp salt
1 clove minced garlic

Other Ingredients
2 portabello mushrooms, sliced
red pepper, sliced
onion, sliced
zucchini, sliced
1 tbsp oil

tortillas
salsa
vegan sour cream

Directions
1. Mix marinade ingredients together and mix in mushrooms. Let sit in the fridge for a few hours.
2. Fry onions in a skillet in the oil until they start to brown. Add pepper, zucchini and mushrooms. Fry until mushrooms are cooked.
3. Load up your tortillas with the salsa, sour cream and veggie mix. Roll or fold and enjoy :)

Friday, December 9, 2011

Custom Under the Bed Storage Boxes

I made these boxes a while ago. I am not going to include a tutorial because these are pretty basic to make. I just measured the space under the bed and cut out each side of the box separately. I double layered the cardboard for extra strength which made the job a lot bigger but it was worth it. I glued the two plys together with a hot glue gun then taped the sides onto a cardboard base. I coated them with white paper and cut out some patters to pretty 'em up. Hopefully this is not confusing but if anyone were up to copying these I'm sure they would be resourceful enough to figure it out or ask me in the comments. I made three boxes that fit all on one side. I could have made three more for the other side but I already have a purchased storage solution there.

If I had hardwood floors, I would have opted for putting drawers (from an old dresser) on wheels that could fit under the bed. I don't know where I saw the idea but it is awesome and probably less work. You would have to find the right sized drawers though which could be tricky.

Thursday, December 8, 2011

Super Healthy, Almost Instant Asian Soup

I threw this soup together today for dinner. I tend not to want to put a lot of effort into a meal if I am the only one eating it. This was really easy and really quick. The miso and the wakame make it quite healthy. I added toast because it is not the most filling soup. The wakame is extra awesome if your thyroid is sluggish as it contains a healthy dose of iodine. Most people get their iodine from seafood or table salt. I don`t eat fish so seaweed is a healthy way to get iodine in my diet. Miso, a fermented soy product, is a tasty way to get your B vitamins. I did not expect to like miso soup because it is so touted as a health food but it is surprisingly good.

Ingredients
1 pk miso soup mix
wakame seaweed
longxu noodles (any quick cooking noodle will do)
1-2 cups water

Directions
1. Add water to a small pot and set to max. Sprinkle in some wakame and add some noodles. Once boiling, boil until noodles are cooked.
2. Mix in miso soup mix. Enjoy!

Monday, December 5, 2011

Roasting Red Pepper in the Oven

I must admit, I am a jarred roasted red pepper gal. Though way too expensive, it is just easier to buy roasted red peppers by the jar than to roast them myself. But then yesterday I finally had no choice. We had company coming over, I was serving a polenta dish with red pepper coulis. The polenta was made when my hubby came back from the grocery store with four plump red peppers instead of the two jars I requested. The store had run out. My poor husband had to make a call, get the pickled red peppers or get some fresh ones. He made the right choice, the pickled would have been useless.

So I was forced to roast the peppers myself. It was a bit of work but it was much cheaper, made a larger quantity and tasted great in the recipe. All I did was turn the oven to broil, put the clean whole peppers in a large casserole dish and broiled the peppers until the skin bubbled. I turned the peppers a few times to expose all of the skin. Once all the skin was bubbly I took the dish out of the oven, put on the lid and left the peppers to steam for 15 minutes before peeling off the skin. It was a bit of work but not overly difficult. Given the price of the jarred red peppers I suspect I will be roasting them myself going forward. 

Saturday, December 3, 2011

A Great Recipe for Stuffed Tomatoes

I tried out this stuffed tomato recipe tonight and am very happy with the results. It's not my own recipe, it can be found here. There are a few steps involved in this dish but it was still pretty easy to make and it didn't take very long. What I like most about it is the potential to make the dish look pretty. Also, it tasted pretty good. The recipe made a lot more lentil stuffing than I had tomatoes to stuff but I suspect I can fry up the leftovers and it will make a good breakfast tomorrow. I added some dried parsley as a garnish though I would have used fresh if I had some as that would have been prettier. 

Thursday, December 1, 2011

Raw Cookie Dough that Won`t Make You Sick

Cookie Dough!
I love cookie dough. When I was a kid I always wanted to eat it but I was not allowed to because of the raw egg. One year my mom bought a tub of white chocolate macadamia nut cookie dough and left most of it in the freezer. Little did she know that I was sneaking it little by little until the tub was empty. It was good dough, it had to be done.

Now that I`m an adult and can eat whatever I want I make cookie dough for the purpose of eating it raw. There is no egg in any recipe I make now but I purposely leave out baking ingredients because they are just not necessary. I also don`t measure the ingredients so these are approximations.

Ingredients
1/2 cup sugar
1/4 cup of margarine
1/2 tsp vanilla extract
1/2 cup flour
water
chocolate chips

Directions
Cream together first three ingredients. Mix in flour and chocolate chips. If too dry, add water to desired consistency  Enjoy!