
Sunday, November 27, 2011
Fancy Storage boxes
Quick, Cheap Coasters
 This project is really easy. I wanted some basic, matching coasters that would fit well with the decor in the living room. I bought a pack of those adhesive tabs that are suppose to be affixed to cupboard doors to stop them from slamming when they close. You can buy a pack for a dollar at the dollar store. I had some left over tiles so I put a tab on each corner of the underside of the tile to make a quick and easy coaster. I repeated this until I had 4. I still have tabs and tiles left over
so if I needed to I could easily throw together another coaster or two if we have more guests. There is a lot of creative potential with these. I might try painting a few for special occasions or perhaps as gifts.

Indoor Veggie Garden
 My Husband made me something awesome for my birthday (which was in May). He put together a small indoor garden for me in the office. It is made out of 4 small garbage cans filled with soil and has a grow light with a tin foil coated top that reflects the light back to the plants. We've tried growing veggies on the patio in previous years but it is covered and there was not enough light. The only thing that grew was the swiss chard and some Herbs but the squirrels attacked the herbs.
 I'm stoked that the indoor garden is working. The peppers are doing really well and I have okra growing too. I just started some lettuce, spinach, cilantro and dill. Hopefully they will thrive too now that I added some organic fertilizer. It takes a bit longer for the plants to grew indoors with the light but once assembled the whole thing is pretty low maintenance. I can't wait until the veggies start growing on the plants.
Thursday, November 24, 2011
Tutorial: Creating Custom Storage Boxes
I needed a place to keep my baby's clean cloth diapers near my diapering station but there was very limited room to work with. Whatever was going to work had to fit between the desk we are using as a change table and the door frame beside it, only 26 cm. I couldn't find anything in stores so I made a container out of the box our car seat came in. It didn't talk long at all and turned out better than I expected. Here is how I did it. If you need a custom container you could repeat this tutorial with your own specific dimensions.
Step 1- Lay the original box flat on the ground with the sturdiest corners on the outside. I wanted the length and width to be 25 cm so I drew a line in pencil 25 cm from each outside edge on both sides and cut out the remainder in the middle. The middles can be discarded or set aside for another project.
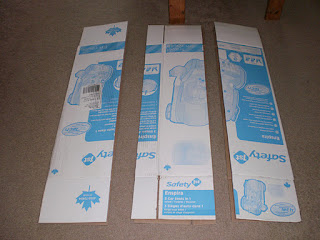
Step 2- I cut the two outside pieces to the height desired and discarded the excess. It doesn't matter if you trim the top of the box or the bottom as log as you are consistent with both pieces.

Step 3- Lay the two pieces beside each other with two cut ends touching and tape together with some duct tape.

Step 4- Fold into a box then tape to keep it together. The base flaps (or top flaps depending on which side y0u cut) of the original box will fold to form the base of your new box. Keep the base together with a few pieces of tape.

Step 5- The rest is easy. Simply reinforce the base by putting a piece of duct tape over every corner. I covered my box in white paper then reinforced the corners with a strip of duct tape over each corner edge of the box. I finished the rough edges on top with more black duct tape.

And here is the finished product. It is tidy looking which is what I was going for, and fits the space perfectly. The pail below keeps the dirty diapers before they are washed. We recently started using the cloth diapers and this set up is serving us well so far. The only problem is the cats like the box so I have to make a lid to keep them out.

Saturday, November 19, 2011
Awesome Slow Cooker Chili

Ingredients
1 cup of dried beans (I used half kidney, half black eyed peas)
5 cups of water
1 tbsp oil
1 large chopped onion
2 cloves minced garlic
4 chopped tomatoes
1 tbsp chili powder
1/2 tsp curry powder
2 tsp cumin, ground
1/4 tsp ground cayenne
salt to taste
Directions
place beans and water in slow cooker on high until beans are cooked. This took my slow cooker about 5 hours. If there is a lot of water remaining after cooking time, ladle some out (there should not be a full layer of water covering the beans). Heat oil in frying pan then add onion. Fry for about five minutes then add garlic and continue to fry until garlic is golden but not browned. Add to the slow cooker. Add remaining ingredients to cooker. Simmer for 30 minutes and serve.
Quick and Easy Potato Soup with Dumplings
I made this soup tonight and remembered just how simple it is so I thought I would post it. It's the perfect recipe for a weeknight because it is so quick, requires little prep and is nice and filling. My husband is a fan.
Servers 2-4
Ingredients for Soup
4 potatoes, peeled and chopped
4 cups of vegetable broth
1-2 cups water
1/2 cup soy milk (or other kind of milk)
Ingredients for Dumplings
1/4 cup soy milk (or other kind of milk)
1 tbsp oil
1 tsp lemon juice
1/2 cup of Flour
1/4 tsp salt
1 tsp baking powder
Directions
For the soup, add broth, water and potatoes to a pot and bring to boil. Reduce heat if needed and boil until potatoes are tender. Mash potatoes with a masher while in pot. Its fine if the potatoes are a bit lumpy as that is just added texture. Add soy milk.
For dumplings, mix soy milk, oil and lemon juice in a small mixing bowl. Add flour, salt and baking powder to the bowl and mix. Cut dough into 4 and drop into soup. Cover and let steam for 5-10 minutes and serve.
Sunday, November 13, 2011
Mornings
I hated 6:00am. Every weekday I would have to get up at 6:00am. I was always tired. It always felt too early. Three weeks ago I changed my mind about 6:00am. 6:00am is no longer reserved for weekdays. The reprieve of the weekend sleep-in has disappeared. I don’t miss it. I love 6:00am.
Why? Because that is when my little love wakes up. He begins to fuss about until I pick him up. We head to the living room and I feed him. I can’t help but stair at his tiny, perfect little features. He’s too perfect for words.
Why? Because that is when my little love wakes up. He begins to fuss about until I pick him up. We head to the living room and I feed him. I can’t help but stair at his tiny, perfect little features. He’s too perfect for words.
Subscribe to:
Posts (Atom)